This topic I will be working on Posting Documentation “how-to”
I will see about creating a table of Content. This topic will eventually have Posts moved and organized properly at some point in the future.
This topic I will be working on Posting Documentation “how-to”
I will see about creating a table of Content. This topic will eventually have Posts moved and organized properly at some point in the future.
This guide explains how to create polls on Xrtropolis.one to gather votes from users on any topic.
Required user level: All users
By default, polls are enabled for Users of trust level 1 or above are allowed to create them.
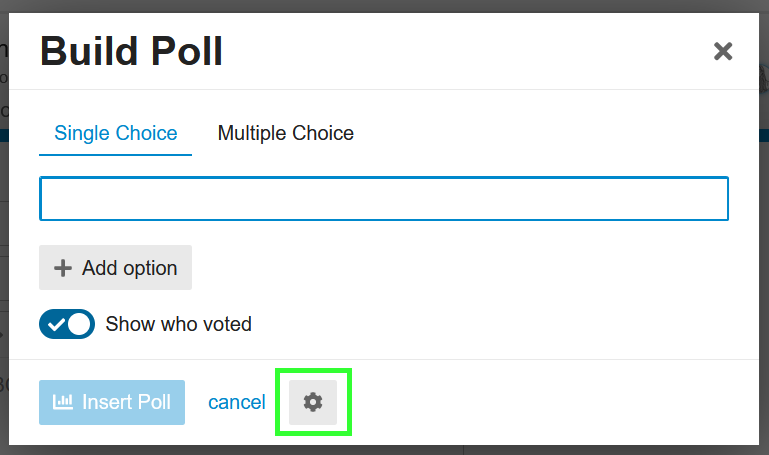
The easiest way to create a poll is to use the poll builder. The poll builder can be accessed from the ![]() menu in the composer, and allows you to make a poll without needing to know the exact syntax.
menu in the composer, and allows you to make a poll without needing to know the exact syntax.
To show advanced options press the ![]() icon. This will show you different poll options such as if the poll auto closes, set groups allowed to vote, choose bar or pie, etc.
icon. This will show you different poll options such as if the poll auto closes, set groups allowed to vote, choose bar or pie, etc.
Poll type:
2, the max is 10, and the step is 2, the options will be 2, 4, 6, 8, and 10.Results:
Allowed groups:
Allows the poll creator to limit which groups can participate in the poll. Users not in the listed groups will be able to view the poll, but not vote. Default is all users can participate, no group limitation.
Chart type:
For Single or Multiple Choice polls, choose whether to display the result in a bar graph or pie chart.
Show who voted:
Enabled by default, this allows those who can view poll results to also view the specific choices of each poll user. (Bar Chart type only)
Automatically close poll:
Allows the poll creator to set a date/time for the poll to close automatically. Unlike manually closed polls, auto-closed polls cannot be re-opened.
Polls can even include images! After using the poll builder to insert the poll, images can be uploaded to the post and manually added to the poll. Uploaded images should be small, or adjusted to display at a lower percentage:
[poll type=regular]
* 
*

* :
[/poll]
[poll type=regular]
* Cat: a small domesticated carnivorous mammal with soft fur, a short snout, and retractile claws.

* Dog: a domesticated carnivorous mammal that typically has a long snout, an acute sense of smell, and a barking, howling, or whining voice.

* Fish: a limbless cold-blooded vertebrate animal with gills and fins and living wholly in water.

[/poll]
Polls can also include relative dates! In a similar way to adding images, after using the poll builder to insert the poll you can insert dates into the poll options via the “Insert date / time” composer button:
[poll type=regular]
* [date=2019-10-13 timezone="Europe/Paris"]
* [date=2019-10-12 timezone="Europe/Paris"]
* [date=2019-10-11 timezone="Europe/Paris"]
[/poll]
If multiple polls are used in a single post (like this one!) each poll will need a unique name or they will not work. When using the poll builder each extra poll will be numbered sequentially, but you can also do this manually by adding name="poll_name" as a parameter:
[poll name="poll_1"]
1. option one
2. option two
3. option three
[/poll]

[poll name="poll_3" type=multiple min=2 max=3]
- option one
- option two
- option three
- option four
[/poll]

[poll name="dave" type=number min=2 max=10 step=2]
[/poll]
While the poll builder is the easiest option, it is also possible to manually create and edit polls within the composer itself.
To create a simple poll, surround a markdown list with [poll] and [/poll]:
[poll]
* option one
* option two
* option three
[/poll]
-or numbers instead of asterisks*.
This will create the following result:
To manually create more complex polls, additional parameters can be added to the poll tag. For instance:
[poll type=multiple results=on_vote min=1 max=2 public=true chartType=pie groups=trust_level_1 close=3024-12-31T00:00:00.000Z]
# Do you like polls?
* Yes
* No
* Maybe
[/poll]
(Though not all options will make sense for all polls ![]() )
)
Using the poll builder is a great way to find out the format of these additional parameters for later use.
Even with no group voting restrictions on the poll itself, users must be able to reply to the topic where the poll is created in order to participate. Users with see only permissions will not be able to vote.
All votes are cleared when a poll is edited, to ensure the poll creator can’t change the choices a user voted for. As such, by default polls can only be edited for a grace period of 5 minutes after being created.
Votes cannot be recovered once a poll is edited and the votes are cleared
Staff can use the Discourse Data Explorer - Plugin - Discourse Meta to export poll data as a csv, which can be imported into the data analysis program of their choice.
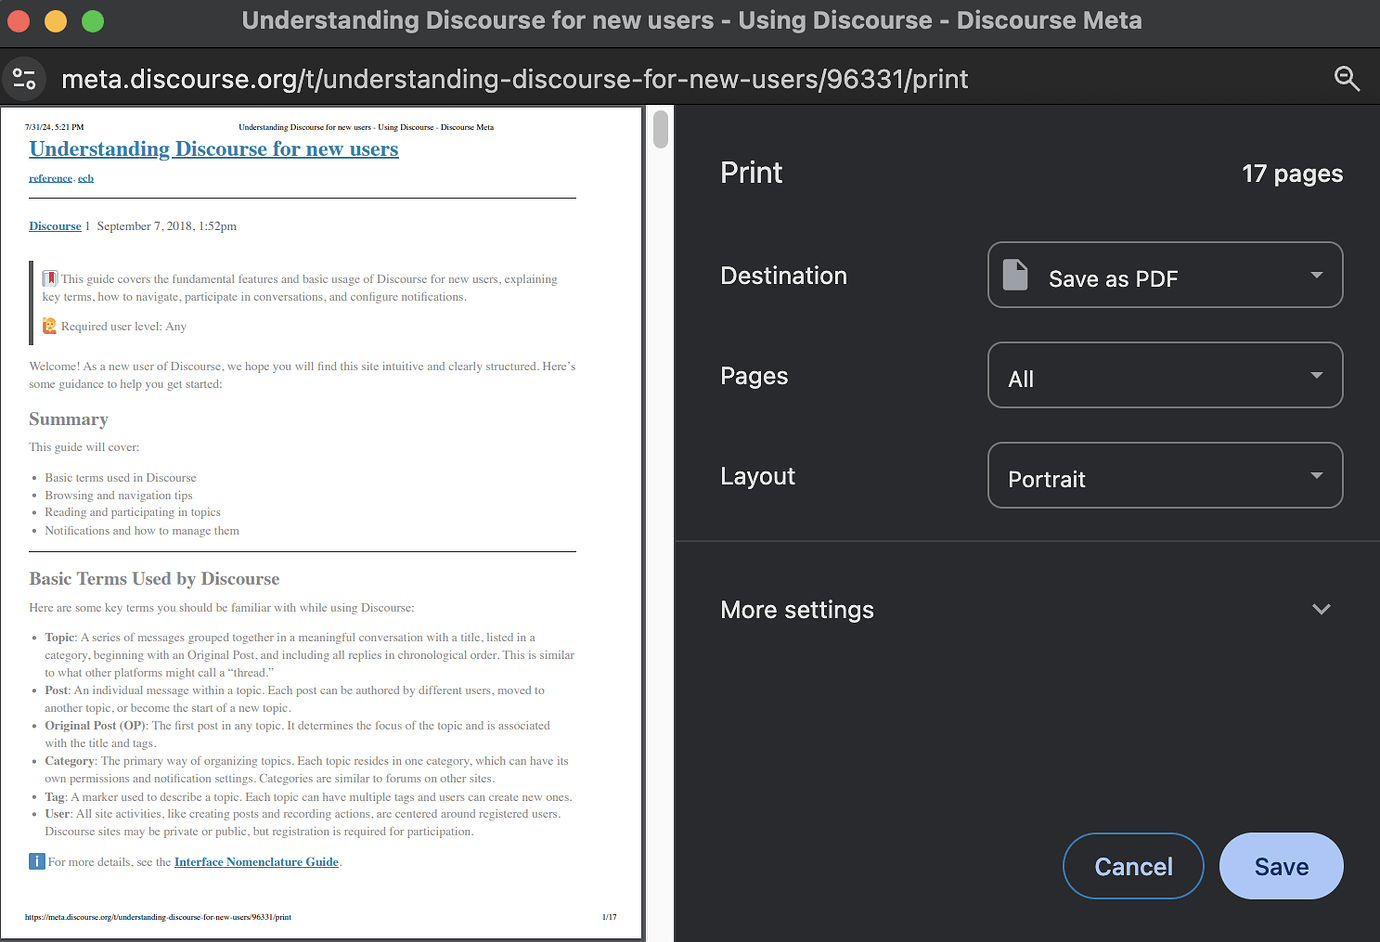
Xrtropolis.one allows you to generate a PDF of a topic by using the Print topic keyboard shortcut. The shortcut for your system is noted in the keyboard shortcut reference modal that pops up when you press the ? key while browsing a Discourse site.
Using the shortcut will open a new browser window where you can optionally choose to print the topic as a PDF. The interface will vary by browser, but it will look something like the example below:
Xrtropolis.one intercepts the keyboard shortcut and renders the print view server-side to ensure the entire topic is printed.
The same functionality can be triggered by appending /print to the end of a topic’s URL.
You can technically select the print option in your browser’s File menu as well, but you will likely need to scroll from the first post to the last post of the topic to ensure all of the posts have loaded into view.
There is a max prints per hour per user site setting that allows an admin to set a maximum number of /print page impressions per hour per user. It defaults to 5 and can be set to 0 to disable Xrtropolis.one’s topic printing functionality (printing from the browser menu still works).
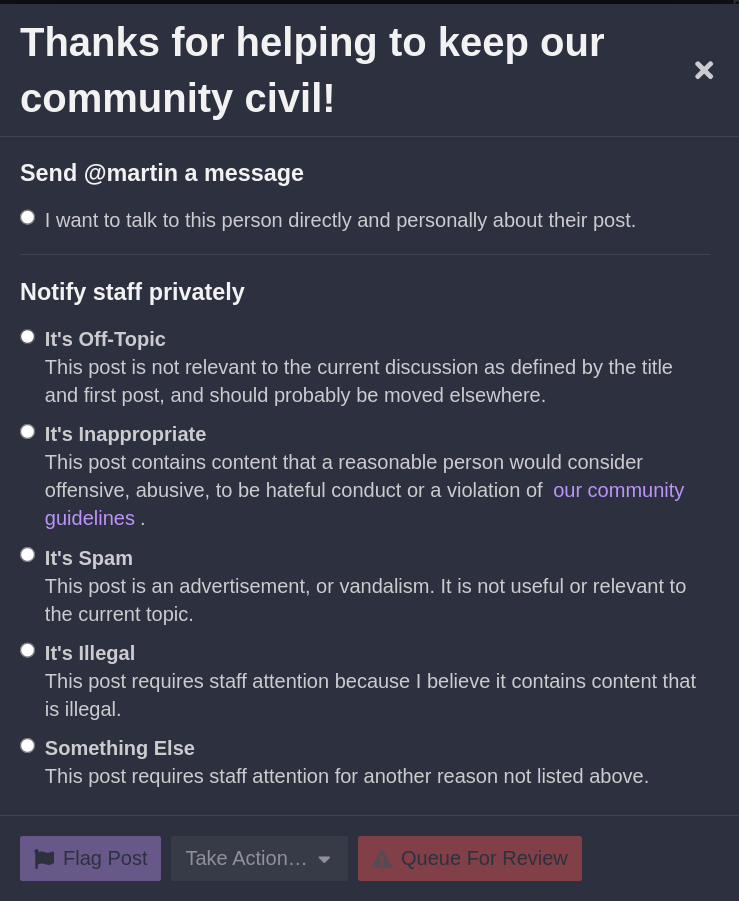
Flagging is an important moderation tool. It helps maintain a civil and productive discussion environment by allowing users to report inappropriate content without derailing the conversation.
Flag a post when you encounter content that:
*Note that your specific forum may have some different options in this screen - flagging options are customizable by forum admins.
A topic with 12 unresolved flags from at least 5 different users will be automatically closed until moderators can review it.
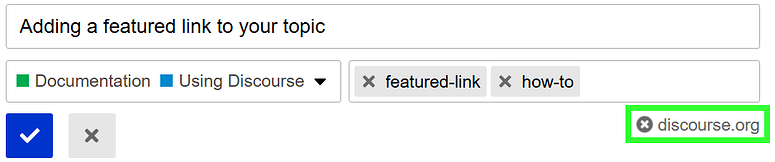
Featured links allow you to paste a URL in the title box when creating a topic and the link is then included in the topic information on both the topic header and in topic lists. This can be useful when creating a topic about a particular news article or product.

When creating a new topic:
The featured link will appear below the topic title once posted.
Adding a featured link to a topic is much easier (and recommended) using the method above, however, it is possible to add one afterwards if you need to:
Be cautious when using this method as it involves temporarily deleting your content. Always ensure you have made a copy of the content before trying it out.
To remove a featured link:

This action is often referred to as “unlinking” the featured link in Discourse terminology.
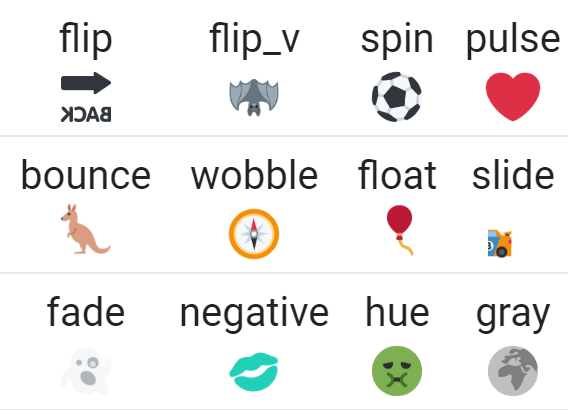
Emoji Fluff allows users to put mirrored or animated emojis in their posts.
It allows users to post fancy emoji work such as:
![]()
You can choose these decorations from the emoji autocompletion pop-up, from the emoji picker, or by appending keywords directly after the emoji shortcode:
Examples: :bike:f-slide , :smile:f-bounce
Horizontal and vertical flips can be combined with other decorations.
Examples:
:horse:f-slide,flip::spider:f-float,flip_v: